Just like crown molding, baseboards add extra beauty to a room. When designing a new room, a well-chosen baseboard can be a principal component. There are a wide variety of baseboard alternatives to pick from, including the shape, material, color, and height.
But when a baseboard meets with tiles, caulking is a core step. Caulk should be used if the space between your baseboards and tile floor is less than 1/4 inch wide.
When sealing the gaps between the floor and tile, you must use a paintable caulk. Apply it carefully, then paint it the same color as the baseboards. Here is the full process of doing it.
What Is Caulking and How Do You Seal the Gap Between Baseboard and Tile?
Caulking is the process of filling gaps and cracks on any hard surface. It can be both dry and moist. A caulking process may depend on the elasticity of the caulking material and brand as well.
Sealing Process
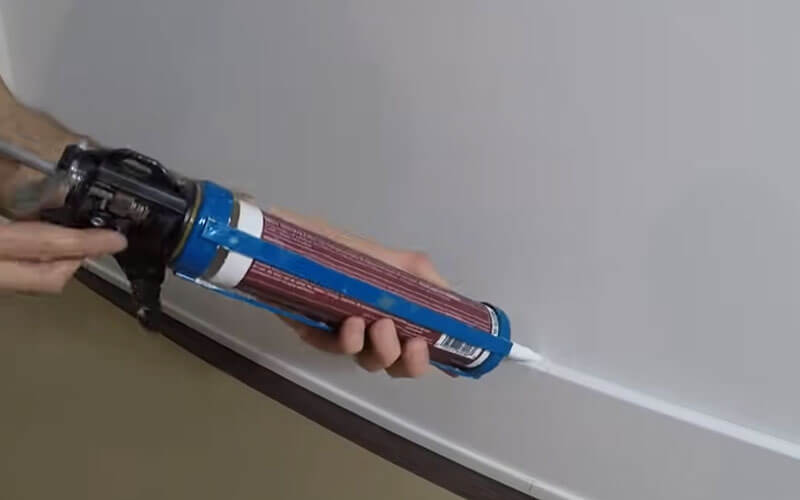
Attaching the baseboard to the tile caulking process is very obvious. To begin this process, first of all, the tile surfaces need to be cleaned. Next, choose Gorilla Waterproof Caulk & Seal 100% Silicone Sealant as the best baseboard caulk, and cut it at a 45-degree angle.
Use a caulk gun to fill the gap between the tile and baseboard. Then, with this same process, finish all over the tile row. After finishing, just let them dry and remove the excess dry caulk with a wet sponge.
Materials Required for Caulking Baseboard to Tile Floor
- Paintable caulk
- Caulking Gun
- Gloves
- Knife
- Wet clothes
Caulk Baseboard Application to a Floor with Attached Tile
1. Select the Best Caulk
Caulk! Do not just be confused about the word because there are different kinds of caulk for different purposes. You are here to set the baseboard with tile, so choose caulk wisely.
- Acrylic Caulk

This caulk is not very sticky, and its capacity makes it an easier material to work with. So it’s no surprise that this caulk is so popular. Working with it is also less of a hassle.
Two coats of acrylic caulk give the proper outcome on any tile surface. Therefore, with this caulk, a user can apply it to the edges of the tile.
Acrylic caulking is not waterproof, which is a drawback. As a result, they should not be used in showers, kitchens, or other areas where hygiene is an issue.
- Silicone Caulk

Because of the various advantages, silicone caulking is frequently used in place of tile—for example, its long-term usability and strong attachment.
Caulking glass and metal baseboards with ceramic tiles are easy with silicone. Because of this, the shower is a great area to use it. However, it’s not suitable for wooden baseboards.
- Latex Caulk

Leaks and holes on the baseboard can be repaired with latex caulk, which is waterproof and paintable. It dries quickly and provides a rubbery moisture barrier. It prevents water damage and the weather from reaching your household.
If you’re looking for a sealant that will handle any range of motion in your house without leaking or cracking, this baseboard caulking is the right choice for you. While applying this caulk, use gloves to avoid the mess.
2. Surface Cleaning Procedure

Get rid of all the sand, paint, dirt, grease, and other contaminants. For silicone caulk removal, make sure that all residue is removed entirely. Next, the joint surface can be cleaned with rubbing alcohol or a cleaning spray purchased at the store. After completely rinsing, allow it to dry with a clean towel.
3. Taping and Caulking
- Taping
Tape the edge of the tile where the baseboard meets the wall with painter’s tape. Caulk should not be allowed to spread onto the tile. Otherwise, it will look bad and unprofessional. When looked at from above, the edge of the tape should line up with the edge of the baseboard. The caulk creates a seal that goes from the baseboard to the tile.
This is a very important part of cleaning up. It might take a long time, but it will be worth it in the long run. Doing it this way will give you a great seal between the baseboard and the tile. When everything is done, it will look great.
- Caulking
Step 1: Cut the caulk tube’s tip at a 45-degree angle to leave a 1/8-inch hole. Use the tube of caulk to seal the hole between the baseboard and tile.
Move forward in a steady, planned way. Check to see if there are still any holes. Take the tip off the caulking tube and throw it away; your caulking gun is all set to go.
Step 2: Use a thin bead of caulk to fill the space between the baseboard and the tile. Do this slowly and steadily. You can also caulk the top of the baseboard if you need to.
Step 3: For professional baseboard installation, the top of the baseboard must be sealed with caulk where it meets with the floor or surface. If there is a gap, you should use the chance to close it.
Step 4: Once the space is filled with caulk, use a caulking tool to make it smooth. This will get rid of any bumps and make the surface smooth and shiny. This smooth surface is nice to look at, but it will also be easy to paint and keep dirt away.
Use this tool to smooth the caulk between the baseboard and the tile. Caulk a smooth, flat surface to make painting and cleaning easier.
Step 5: You can smooth the caulk with your finger if you know how to caulk. On the other hand, using a caulking tool will give a better finish and make fewer messes.
When the caulking process is done, keep it set for 24 hours or more. Then remove the tap and clean the leftover caulk with vinegar or wet clothes. After properly drying, paint over the caulk as per the grout color.
Caulking Baseboard to Tile Tips

To cover a gap between your baseboard and tile floor that is up to 1/4-inch wide, you should:
- Choosing a good latex or silicone painter’s caulk is a good choice.
- Apply painter’s tape to the tile at the base of the staircase
- Baseboard and tile joints should be sealed with caulk
- Use a caulking tool or your hands to smooth out the caulk
- Baseboard trim paint can be used to paint the caulk
- Install shoe molding on your baseboard first if the gap is bigger than 1/4 inch
So, follow these steps to seal the gap between the baseboard and tiles.
Want to Learn More:
- Using Grout Instead of Caulk: Possible or Not?
- How Long Does Silicone Caulk Last: Reason for Aging and How to Prevent It!
- 10 Best Shower Caulks To Prevent Mildew – Top Notch Picks
Hello! this is John Cox. If I’m not wrong, you love Home. Right? And you already met one of them who’ve been in this field since 2005 and still go on. According to my interest, I’ve started this blog to share my thoughts about Home sectors, and you’ll love it.
